Wednesday 12 September 2012

Sega:
EGA of America, Inc. (collectively, "SEGA" or "we") respect the privacy rights of our online visitors and are committed to protecting the personal information collected about you. To further this commitment, we have adopted this Online Privacy Policy ("Privacy Policy") to guide how we collect, store, and use the information you provide us.
History OSega Genesis:
In 1987, 16-bit personal computers such as the Commodore Amiga and Atari ST, and 16-bit arcade machines made video game consoles look not so good. At this time, Nintendo had a 95% market share in the US and 92% in Japan. It was no use for Sega to continue battling with its Master System console. It was time to try a new way of outdoing the competition.
Sega's arcade machines using System 16 technology had become very popular. Sega CEO Hayou Nakayama decided it was time to bring this technology into home videogame consoles. Sega began developing their new 16-bit console based on System 16. Their final design worked out so well that they used the technology to make three new arcade boards (MegaTech, MegaPlay and System C). This now meant that any game made for these arcade machines could be almost perfectly ported to their new console. Sega also made their console backwards compatible with the Sega Master System with an add-on device later named the Power Base Converter.

Monday 10 September 2012

Need For Speed 2 Game For PC Full Version Free Download

Posted by Crypto Magic World on 04:10 with No comments
Free Download Need for Speed 2 racing game. No need to install. Extract and play. Car games are easy to play and bring lot of fun and enthusiasm out of racing game player. If you are a Need for Speed racing game fan, then you might have been playing need for speed shift, need for speed underground 2, need for speed underground, need for speed most wanted, need for speed undercover, need for speed carbon or need for speed pro street by now, but you can’t forget Need for Speed II.

Remember Need for speed 2 SE (NFS II SE)? Okay, here it is. Download Need for speed 2 second edition free for pc. Need For Speed is a series of racing video games developed by Canadian based company EA Black Box and published by Electronic Arts. The series was originally developed by the Canadian based company Distinctive Software, which became known as EA Canada.

Cheats:
Tombstone Daytona car
Bomber Bomber BFS car
FZR2000 FZR 2000 car
Red racer Ford Indigo
Slip Slow motion
Pioneer Pioneer engine

Roadrage Beep horn to crash opponent Hollywood Monolithic studio     
track Madland Different colors Kcjones Multicolor car and horizon
Chase Chase mode.

Mad Smoking cow tires [Note 1]
Slot Slot car mode [Note 2]
Rain Rain mode [Note 3]
Rexrage Dinosaur traffic
Vip Limousine traffic
Schoolzone School bus traffic
Rushhour Increased traffic
Go[18 - 51] Various objects
Go18 School bus [Note 4]
Go19 Pickup
Go21 Truck
Go23 Blue Sedan
Go27 Green VW
Go28 Grey convertible
Go31 Mercedes Unimog army truck
Go33 Yellow snow truck
Go34 Tram
Go35 Limousine
Go40 Crate
Go41 Hand cart
Go42 Wooden stand
Go43 Tyrannosaurus Rex
Go44 Wild West wagon
Go45 Souvenir stand
go46 Souvenir stand
go47 News stand
go48 Log
go49 Crate 1
go50 Beer box


Saturday 8 September 2012


Find the best content for Visual Basic 6 development, .NET interoperability, and migration here.
Partner Tools & Solutions
Leverage these free tools and solutions from our partners to assist you with a more complete migration from Visual Basic 6 to .NET.
Getting Started
1. Migration & Support Strategy
Key Visual Basic 6.0 runtime files, used in the majority of application scenarios, are shipping in and supported for the lifetime of Windows 7. Find out what support options are available to you.
2. Visual Basic 6.0 Resources
You will find plenty of resources here for developing in Visual Basic 6.0 including links to the MSDN Library, technical articles, and code samples.
3. Extend Your Visual Basic 6.0 Applications
Extend your Visual Basic 6.0 applications using the functionality of Visual Basic .NET without upgrading. These resources show you how.
4. Upgrading from Visual Basic 6.0
Do you need help in upgrading your Visual Basic 6.0 applications to Visual Basic .NET? This section provides the necessary resources.
Acknowledgement
would like to express my sincere gratitude to many people who have made their
contributions in one way or another to the successful publication of this book.
My special thanks go to my children Xiang, Yi and Xun. My daughter Xiang edited this book while my sons Yi and Xun contributed their ideas and even wrote some of the sample programs for this book. I would also like to appreciate the support provided by my beloved wife Kim Huang and my youngest daughter Yuan. I would also like to thank the million of visitors to my Visual Basic Tutorial Website at www.vbtutor.net; especially those who contributed their comments, for their support and encouragement. Finally, I would like to thank my publisher
Book Surge for the guidance and assistance in producing this book.


Sunday 2 September 2012

Marvel Action Pack Games For PC Full Version Free Download

Posted by Crypto Magic World on 00:52 with No comments

Marvel Action Pack! lets you demonstrate your skills alongside the superheroes. Claw your way to the top in Wolverine MRD and Wolverine Search & Destroy. Make the Hulk green with envy of your skills in Hulk Vs Hulk Bad Altitude and Hulk Central Smashdown! Grab your shield to help Captain America defend his city in Captain America:
Uit up and get ready to show you've got what it takes to make it among the pantheon of superheroes. Marvel Action Pack! combines 10 arcade-style games featuring favorite superheroes from the Marvel universe. Put yourself to the test and prove your skills in superhero-style action that comes alive on screen to thrilling effect.
Red Skull and Crossbones. Suit up with Tony Stark in Iron Man Armored Popper, Iron Man Flight Test, Iron Man Armory Assault and Iron Man Flight Test 2.0
Within 10 arcade toys with the characters invented by the studio Marvel Simple arcade flash games released by mistake on the disk, done quite beautifully. You have to jump, run and destroy the enemies of all shades.
LIST OF GAMES
Wolverine MRD
Wolverine Search & Destroy
Hulk Vs.
Hulk Bad Altitude
Hulk Central Smashdown!
Captain America: Red Skull and Crossbones,
Iron Man Armored Popper
Iron Man Flight Test
Iron Man Amory Assault
Iron Man Flight Test 2.0
System Requirements
Processor= 1.0GHz
RAM= 256MB

Saturday 1 September 2012

If you have multiple authors on your blog then you can share the earnings exactly on the individual’s percentage of the actual adsense revenue generated from articles that they have written.
Revenue sharing program on a blog, lets all the authors to put their own adense ads inside the articles they write. In this way, an administrator doesn’t have to pay its writers a fixed amount or share revenue from one adsense account on the basis of pageviews; when the admin and authors have their own separate adsense accounts, revenue sharingscheme eliminates the hassle of sharing the revenue equally and everybody gets his share with justness.

Unfortunately, Blogger.com users find it difficult to integrate this scheme in their blogs as there is no such support of plugins like in wordpress. But on the other hand blogger blog and it’s template is so customizable and flexible that you can customize and edit each and every bit of it.
By making some small changes in your blogger blog’s template you can implement a revenue sharing scheme without having any expertise.
Note: It is assumed here that the ads on which you’re implementing revenue sharing, are INSIDE the blog posts. All the changes in the templates are explained below are for ads inside blog posts. If you don’t know how to put adsense adsinside your blogger blog posts read here.
1.Sign in to you Blogger.com
2. Go to Layout > Edit HTML
3. Tick “Expand Widget Templates”
4. Find (ctrl+f) for :
<p><data:post.body></p>
If you already have ads installed, then you just need to add some conditional tags around them. Otherwise learn how to install ads first and then come to this page to go with further installation.
Now depending on the placement of the ads (above or below the post’ text), you will find your adsense ads’ code.
5. Just replace ads code with this:
<b:if cond='data:blog.pageType == &quot;item&quot;'>
<b:if cond='data:post.author == &quot;AUTHOR1Name&quot;'>
Insert Ad Code for AUTHOR1 here (first author)
</b:if>
<b:if cond='data:post.author == &quot;AUTHOR2Name&quot;'>
Insert Ad Code for AUTHOR2 here (second author)
</b:if>
<!-- Add many ad codes for different authors as you want above this line -->
</b:if>
Repeat the above step and add the conditional tags for each individual author of your blog.
Remember to replace AUTHOR1Name and AUTHOR2Name (and anyone else) with actual and exact Display Names of the authors and insert their actual ad codes.
6. Save Template.
Now to verify that correct ads are shown for different authors, visit posts created by various authors of your blog.

Friday 31 August 2012

Inserting Adsense ads inside Blogger Blog Posts

Posted by Crypto Magic World on 09:20 with No comments
Placing adsense inside the blog posts increases adsense ads CTR (click through rate).
Using simple layout page, you can place these ads anywhere in your blogger blog, like in the sidebar, before posts, below posts even between the posts, but by using any gadget, you can’t place them INSIDE any post.

WHY TO PLACE ADS INSIDE POSTS?

There’s no gadget available to place adsense ads inside the posts. So, to Place adsense ads inside a blogger post, you have to modify the template a little bit to place the adsense code in there.
And if you dont know, then let me tell you that CTR of the ads inside the blog posts is much more higher than the ads outside posts.
There are dozens of articles explaining this method of placing ads, but most of them are either poorly explained or without any screenshot. But here I’ll try to keep the procedure as simple as possible.

So, here it is:

INSTALLATION

1. Get your adsense code, and Encode it before placing.
To do the encoding, you can use “Postable” or use other sites.
2. Now, go to Layout section and “Edit HTML” tab.
3. Its always recommended to download a backup of your template before making some changes. So download the template!
4. Click “Expand Widget Template” checkbox.
5. Press “Ctrl+F” and find:

<data:post.body/>

If you are using “Expandable Post Summaries” in your template, then you’ll find <p><data:post.body/></p> and infact two of them.
In that case, you are supposed to place the adsense code above the first

<p><data:post.body/></p>
6. Now Copy the code below and paste it just ABOVE the tag you searched in step 5.

<b:if cond='data:blog.pageType == &quot;item&quot;'>
<div style='float:center;padding:5px;'>
--- PLACE YOUR ENCODED ADSENSE CODE HERE ---
</div>
</b:if>
…Don’t forget to replace the text in red with your encoded adsense ad code, that you have done in step 1.
These <b:if> and <div>tags will decide the alignment of your ad. So dont leave these while pasting the adsense code.
DONE! After doing this step, An adsense ad will be placed just below the title and above the text of EACH and EVERY post of your Blogger blog automatically.

PLACING ANOTHER AD INSIDE POSTS

Now if you want to place another ad inside posts, but below the text of the post..You can search fo the same tag of step 5.
But this time place the code (of step 6) BELOW it.
This will place another adsense ad below the text of all the posts of your blog automatically.
Now you have 2 adsense units INSIDE your blog posts. One Just below the titles/above the text and second at the end of the posts’ text. :)
Your code should look like this after placing the ads code.
placing-adsense-ads-code-inside-blogger-blog-posts
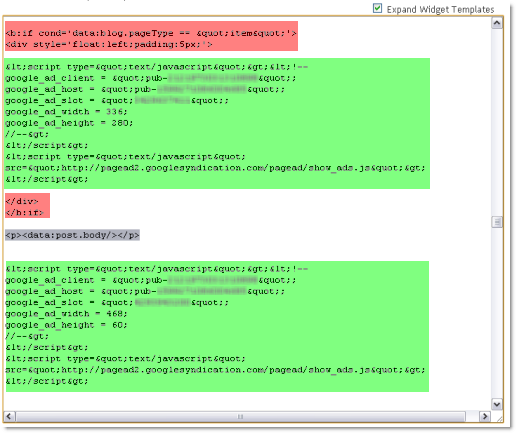
The highlighted gray area is the tag that you have to search.
Highlighted green area is the (encoded) adsense code.
Highlighted red are the <b:if> and <div> tags that assign the alignment of the ads. I highlighted them, just to make the picture clear and easy to understand.
(Don’t leave these tags while copying from step 6!!)

CUSTOMIZATIONS:

You can change the placement and alignments of these ads within the post.

ALIGNMENT

Just change the “center” (in blue) in step 6, to “right” or “left”, to change the ad’s alignments respectively.
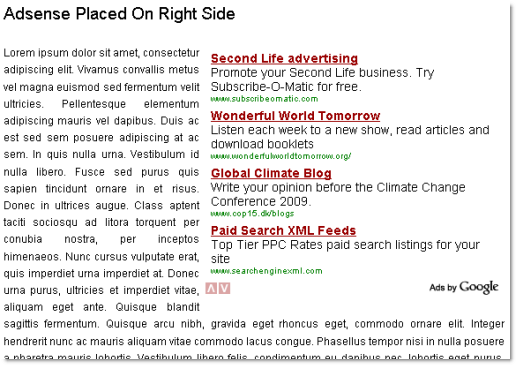
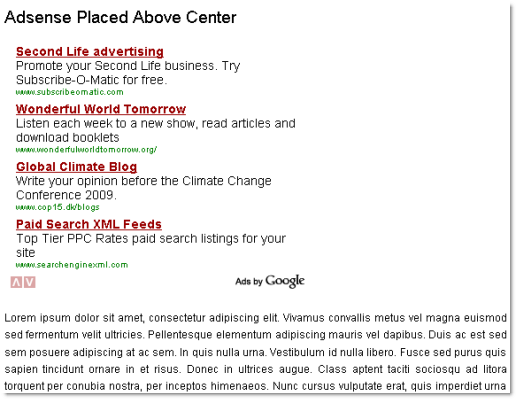
See these screenshots, to understand the alignments.
“float: right”
adsense-placed-on-right-side
“float: center”
adsense-placed-above-center

PLACEMENT

You can also place the ads side by side inside the post.
To do this, you have to place both the ads, either ABOVE or BELOW

<p><data:post.body/></p>
And after that, make one ad to float “left” and the other one to float “right”. :)

Remember:

You can place maximum 3 adsense units on a page as per Google’s Terms. If you are placing 2 inside the post, then you can place only one outside the post.
Like I placed, 1 in side bar, 1 inside the posts (just below titles) and remaining 1 below posts and just above “Related post”. ;)
Hope you have got the simple procedure.

Tip:

Instead of viewing your blog after saving changes in the template after each step. Use “Preview” feature for quick views.
Although clicking is not enabled in preview window, but there’s a little trick, to enable clicking in preview…
While the preview window is loading, quickly click any post title as soon as you see any. This will open that post in the preview window, and clicking will also be enabled. You can then see the changes you’ve made! ;-)

This widgets really helps you in keeping the visitor’s interest in your blog. A reader finds this widgets when he reaches the end of an article.
Related posts widgets shows all the posts related to the article currently being read. It actually fetches and shows all other posts with the same label with which current post is labeled.
< imageanchor="1" style="margin-left: 1em; margin-right: 1em;">
To see a demo, scroll down below this post, to view “Related Articles”.
To install this in your blogger blog, follow the steps:
1. Goto Layout > EDIT HTML
2. Find </head> and just ABOVE that paste the code:
<!--Related Posts Scripts and Styles Start-->
<style>
#related-posts {
float : left;
width : 540px;
margin-top:20px;
margin-left : 5px;
margin-bottom:20px;
font : 11px Verdana;
margin-bottom:10px;
}
#related-posts .widget {
list-style-type : none;
margin : 5px 0 5px 0;
padding : 0;
}
#related-posts .widget h2, #related-posts h2 {
font-size : 20px;
font-weight : normal;
margin : 5px 7px 0;
padding : 0 0 5px;
}
#related-posts a {
text-decoration : none;
}
#related-posts a:hover {
text-decoration : none;
}
#related-posts ul {
border : medium none;
margin : 10px;
padding : 0;
}
#related-posts ul li {
display : block;
background : url(&quot;http://2.bp.blogspot.com/_u4gySN2ZgqE/SnZhv_C6bTI/AAAAAAAAAl4/Rozt7UhvgOo/s200/greentickbullet.png&quot;) no-repeat 0 0;
margin : 0;
padding-top : 0;
padding-right : 0;
padding-bottom : 1px;
padding-left : 21px;
margin-bottom : 5px;
line-height : 2em;
border-bottom:1px dotted #cccccc;
}
</style>
<script src='http://sites.google.com/site/allfreecoursesblog.blogspot.com/uploads/Related_Posts.js' type='text/javascript'/>

<!-- Related Post script END -->

3. Now, search for
<data:post.body/>
And just AFTER this, paste this code:
<!--Related posts-->
<b:if cond='data:blog.pageType == &quot;item&quot;'>
<div id='related-posts'>
<font face='Arial' size='3'><b>Related Articles: </b></font><font color='#ffffff'><b:loop values='data:post.labels' var='label'><data:label.name/><b:if cond='data:label.isLast != &quot;true&quot;'>,</b:if><b:if cond='data:blog.pageType == &quot;item&quot;'>
<script expr:src='&quot;/feeds/posts/default/-/&quot; data:label.name &quot;?alt=json-in-script&amp;callback=related_results_labels&amp;max-results=10&quot;' type='text/javascript'/></b:if></b:loop> </font>
<script type='text/javascript'> removeRelatedDuplicates(); printRelatedLabels();
</script>
</div></b:if>
<!--Related posts ends-->
If you want to change the title then change the text in red.
Number in green is the number of posts this hack can show. You can increase/decrease the number of posts according to your need.
4. Save the template and view any post.

SEO: Best Meta Tags to Optimize your Blogger Blog

Posted by Crypto Magic World on 08:14 with No comments

To get a higher rank in search engines, adding meta tags to your blog is the MOST essential thing to do just after you create your blog. Most of the bloggers face low traffic problem with their blogs just because of the missing meta tags in their blog’s template.
Meta tags are a great way to provide search engines with information about your site. It’s an essential part of your SEO(Search Engine Optimization) which tells search engine about a blog and it’s author and helps you get a high ranking which in turns gives you more traffic.
To add meta tags to your blogger blog, do following steps:
1. Login to your Blogger account.
2 Click Layout > Edit HTML
3. Find <b:include data=’blog’ name=’all-head-content’/> and just BELOW it copy following code:
<b:if cond='data:blog.url == data:blog.homepageUrl'>
<meta content='PUT-YOUR-BLOG-DESCRIPTION-HERE' name='description'/>
</b:if>
<meta content='ADD-KEYWORDS-HERE' name='keywords'/>
<meta content='WRITE-YOUR-NAME-HERE' name='author'/>
<b:if cond='data:blog.pageType == &quot;item&quot;'>
<meta expr:content='data:blog.pageName' name='Description'/>
</b:if>
4. Click Save.
After adding this you’ll see a dramatic improvement in your search engine rankings and incoming traffic.

Install/Add Recent Comments Widget in Blogger Blog

Posted by Crypto Magic World on 07:59 with No comments

“Recent Comments” Widget shows your Blogger/Blogspot Blog’s recent comments. This widget is one of the important widgets for blogger blog which helps you in viewing recent comments in your blog.
Follow the simple steps to install a “Recent Comments” Widget in your blogger blog.
1. Click the button to Add the widget.


Sign in to your blogger account (if you’re not already)
2. Choose your blog from the drop down list (if you have multiple blogs) and Click “Configure Gadget”.
3. Make changes according to your needs.
You can choose how many numbers of comments to display, with length of their summaries. By default 10 recent comments and 200 summary length is selected.
4. Click Save.
You’ll be taken to your blog’s layout page, where you can drag and drop the widget where you want to show it.
If you see a video that you want to insert in your blog post then you just copy the HTML code given with the video to embed in a web page. But what to do when we want to embed a flash video(.swf)?

No HTML code is given with a flash video to embed in your web page. However you can obtain the link of the flash video, but still cannot embed in your web page or blog post. To embed a flash video in your blogger blog post, you need to place a small piece of code.
1. Create New Post, and switch to Edit HTML mode of post editor.
2. and paste this code wherever you want to show the flash video:

<p><embed align="middle" allowscriptaccess="always" height="400" pluginspage="http://www.macromedia.com/go/getflashplayer" quality="high" src="http://www.YOUR-SITE-ADDRESS.com/VIDEO-NAME.swf" type="application/x-shockwave-flash" width="550"></embed></p>
3. Publish the post and see the result. 
Blue is the actual video’s link.
Green is the alignment – you may change it to right or left.
Red is height and width of the video.

Top 3 Alternatives to Default Blogger Blog Comment Form

Posted by Crypto Magic World on 01:44 with No comments
After introducing embedded comment form in their Blogs very late by Blogger.com, bloggers found some alternatives to that simple default comment form. Still most of the blogger users do not prefer that default comment form and replace it with other third party comment form that can easily replace the default one.
When I started AllFreeCourses, embedded comment form wasn’t available at that time and an annoying popup comment form was there hidden behind a text link. So I also replaced the comment form with Disqus Commenting system.

So, I would like to introduce with some top of these alternatives that can replace the default comment form in your blogger blog. These third party commenting system are not only advanced or comes with better comments and spam management but also integrates in your blog’s templates so nicely that these comments forms looks just like a native part of your blog.
These commenting systems are definitely far more better than the default one, because of many advanced features, like; Comments Moderation, IP or keywords Blacklisting, Spam Filters, Multiple Admins and many more.
1. Disqus
Disqus Comments is a comment system and moderation tool for your site. This service lets you add next-gen community management and social web integrations to any site on any platform. With your disqus profile you take back control of what you’ve written by tracking and managing your comments all in one place. You can also use Disqus Profile to effortless follow and reply to what people are talking about, on and across different sites having disqus installed.
You can (optionally) choose to send your comments to your Facebook, Twitter, Yahoo or Google friends too.
JS-KIT is a new way to share your content, and watch the live reaction. You can easily and quickly embed Echo onWordPress, Blogger, or any website and turn your static pages into a real-time stream of diggs, tweets, comments and more. Beside putting images and emoticons you can also embed a Youtube video in your comments. You can (optionally) choose to send your comments to your Facebook, twitter, yahoo or Google friends too.
IntenseDebate is the premier commenting system which enhances and encourages conversation on your blog or website. With IntenseDebate you can give your blog readers the opportunity to better engage your blog’s content and each other. It offers numerous features that improves the commenting experience, like the Reply By Email functionality which enables you to reply to and moderate comments via email! You can integrate Facebook and twitter accounts with your comments so that you can send your comments to your facebook and twitter profiles too.
All three commenting systems supports blogger,wordpress and other popular blogging platforms and have very simple installation, just sign up and follow the step by step instructions to install.

With the increasing trend of Google buzz, developers are coming up with new sharing services to support the Buzz users community. RebuzzThis is probably the first of its kind service that allow webmasters to embed a Google Buzzreshare button in their sites or blogs with a counter. Previously I shared a Simple Google Buzz share button but that was without a counter.
ReBuzzThis offers the reshare button with share counter on it. Just like tweetmeme offers for twitter share button.
At home page of ReBuzzthis.com, you can find re-buzzed article from all the sites having the ReBuzzThis button installed. Every time a link/page is shared, it is added and counted on that front page.
ReBuzzThis supports all types of blogs and sites.

Installation

1. Goto ReBuzzThis
2. Choose your button’s style and blogging platform.
3. Click “Get Your Code” button to get the code.
4. Sign in to Blogger and go to Layout Layout > Edit HTML.
5. Check “Expand Widget Templates”
6. Find <p><data:post.body></p>
7. And just ABOVE it, paste the following code replacing the text in red with the button’s code that you got from the ReBuzzThis.

<div style="float: right;">
PLACE-BUTTON'S-CODE-HERE
</div>
Placing code at this place, would show the button at top right of all your blog posts.
(Pasting the code BELOW <p><data:post.body></p> would show the button at the bottom of the posts)
8. Save the template and preview any of your blog posts.
You can preview the button at the starting line of this post.

Thursday 30 August 2012

How to install DISQUS Comments on Blogger Blog

Posted by Crypto Magic World on 22:34 with No comments
When I started using Disqus back in 2008, It was quite complicated to install DIQUS commenting system in a bloggerblog that I used to create a website. You had to download your blog’s backup and upload it to disqus, disqus patched it (to install the new comment system) and give the file back to you and you upload it again to your blog. Pretty complex method to install disqus.
As I’m a big fan of DISQUS form day one, I read their offical blog to get updates and to know new features they include.
Recently they’ve made it much easier to integrate Disqus with your Blogger layout now. Means you don’t have to go for that lengthy process to install disqus. Using the latest Gadget functionality you’re now able to improve the time of integration, and now require no patching of your template.

To install Disqus in your blogger blog:
1. Login to your Disqus account.
2. Go to http://disqus.com/comments/blogger (make sure you’re already logged in)
3. Click “Add Site to Blogger” button.
4. On next page, Authorize Disqus, add a Gadget with your sites Disqus code, and you’re good to go.
Open any post and see the disqus comment form instead of blogger’s default one.


Blogger.com finally introduced two new exciting gadgets  – Popular Posts and Blog’s Stats. Both the gadgets can be added straight from gadget directory  by simply clicking “Add a gadget” from page elements page.


The Popular Posts gadget will automatically find and display your blog’s posts that have the most pageviews.  You can optionally choose whether to display image thumbnails or post snippets in addition to the post title. You can also choose the time window to be used for calculating pageviews and the number of posts you’d like to display.
The Blog’s Stats gadget lets you show off pageview data of your blog, with a handful of configuration options that are easily controlled. You can choose from a variety of styles and display options to suit your blog. You have an option to select the time window to be used for calculating pageviews.
I’d say both the gadgets are very useful and long awaited. Specially the Popular Posts was the most demanded of all time and I’m sure blogger users would be exited to add these in their blogs.

How To Create Ebook Of Blogger/WordPress Blog [FREE]

Posted by Crypto Magic World on 22:09 with No comments

Here is cool online app to convert your blog and its articles in a cool looking ebook that you may give to your readers, friends or anyone who wish to read your written articles offline. So here is the way to convert your blogger or wordpressblog in a (pdf) ebook.
1. Visit Blog2Book
Click On Start Now Button to start the process.
2. Enter the URL of the blog and select blog type (WordPress or Blogger).
Also select how you want to fetch post’s (by latest or Date range).
3. Click on Get the Posts!
This will grab all the posts.
Later, you can uncheck any post that you don’t want to include in your PDF.
In next step you can customize the PDF file.You can select not to include Images and publish date of posts.You can also add the title, subtitle, authors name and choose cover page.
Once you are done with customization click on Create my book! button.
It will take some time depending upon the number of posts to be included.
A link will be given to download in the end.
Cool, isn’t it?
What do you think of this wonderful app? Are you going to create pdf of your blog too after reading this?